I found this cute project on the long thread and just had to share it today. As you all know I'm a big fan of re-purposing old household objects into something new and valuable. Well, this cereal box journal is an example of upcycling at its best. If anyone decides to make their own please let me know and send some pictures. I'd love to share your creativity.
Showing posts with label re-purposing materials. Show all posts
Showing posts with label re-purposing materials. Show all posts
Tuesday, May 12, 2009
Cereal Box Journal
I found this cute project on the long thread and just had to share it today. As you all know I'm a big fan of re-purposing old household objects into something new and valuable. Well, this cereal box journal is an example of upcycling at its best. If anyone decides to make their own please let me know and send some pictures. I'd love to share your creativity.

Tuesday, May 5, 2009
How To Make Your Own Mariachi Band
Happy Cinco de Mayo! While there is an awful lot of history behind this Mexican holiday sometimes a kid just needs an excuse for a party. So, on this 5th of May pull out the most colorful streamers you have, decorate the house and make an impromptu musical party.
Let's see, some traditional mariachi band instruments include a violin, guitar and trumpet. That should be easy enough...
What You'll Need To Make All Three:
- 3 paper towel rolls (one for each instrument)
- 6 rubber bands (3 for the guitar, 3 for the violin)
- 2 rectangular tissue boxes (1 for the guitar, 1 for the violin)
- 2 straws or unsharpened pencils (1 for the guitar, 1 for the violin)
- scissors or a box cutter (for the adult only)
- pencil
- glue
- a whole mess of stickers, crayons and markers
For the trumpet all you'll need is to decorate a paper towel or toilet paper roll with some finger paints, crayons or markers. To make both a guitar and a violin (since its all in how you hold it) you can follow the same steps.
1. Grab an empty rectangular tissue box, turn it on its side and stand the paper towel roll on top of it. Trace around the roll and cut out the traced circle. Now you can slide part of the paper towel roll into the tissue box to serve as your guitar's/violin's handle. You may need to glue around the edges to secure it if you cut the hole to wide. If so, let it dry before moving on to the next step.
2. Pull out the paints, stickers, crayons and markers and let the kids go to town decorating their instruments. Remember if you do use finger paints to decorate your instruments you'll have to factor in drying time. For a last minute project it might be best to use markers and crayons instead.
3. Wrap 3 rubber bands of different widths around the box's pre-made opening to serve as your guitar/violin strings. Slide a straw or an unsharpened pencil under the rubber bands but before the box's opening to help with acustics. And voila you're ready to start your very own mariachi band! {tip: a long wooden spoon from the kitchen can serve as the violin's bow}
The best part about this project is that you're not only surprising your kids with an impromptu party but you are teaching them how with a little imagination you can recycle old junk into a lot of fun.
Let's see, some traditional mariachi band instruments include a violin, guitar and trumpet. That should be easy enough...
What You'll Need To Make All Three:
- 3 paper towel rolls (one for each instrument)
- 6 rubber bands (3 for the guitar, 3 for the violin)
- 2 rectangular tissue boxes (1 for the guitar, 1 for the violin)
- 2 straws or unsharpened pencils (1 for the guitar, 1 for the violin)
- scissors or a box cutter (for the adult only)
- pencil
- glue
- a whole mess of stickers, crayons and markers
For the trumpet all you'll need is to decorate a paper towel or toilet paper roll with some finger paints, crayons or markers. To make both a guitar and a violin (since its all in how you hold it) you can follow the same steps.
1. Grab an empty rectangular tissue box, turn it on its side and stand the paper towel roll on top of it. Trace around the roll and cut out the traced circle. Now you can slide part of the paper towel roll into the tissue box to serve as your guitar's/violin's handle. You may need to glue around the edges to secure it if you cut the hole to wide. If so, let it dry before moving on to the next step.
2. Pull out the paints, stickers, crayons and markers and let the kids go to town decorating their instruments. Remember if you do use finger paints to decorate your instruments you'll have to factor in drying time. For a last minute project it might be best to use markers and crayons instead.
3. Wrap 3 rubber bands of different widths around the box's pre-made opening to serve as your guitar/violin strings. Slide a straw or an unsharpened pencil under the rubber bands but before the box's opening to help with acustics. And voila you're ready to start your very own mariachi band! {tip: a long wooden spoon from the kitchen can serve as the violin's bow}
The best part about this project is that you're not only surprising your kids with an impromptu party but you are teaching them how with a little imagination you can recycle old junk into a lot of fun.
Monday, May 4, 2009
How To Line an Envelope
So your sending a special hello or thank you note and you wanna jazz up your plain white envelope. Only you are using an irregular sized envelope and can't find an liner template to fit it. No problem - I'll show you how to make your own in less than ten minutes with a little re-purposing of items you have around the house.
 Supplies:
- an empty cereal or cracker box
- pair of scissors
- pencil
- ruler
- envelope
- paper to line your envelope with
{tip: you can use wrapping paper for a fun look on a low budget}
- glue stick

How To:
Steps 1 & 2: Break open your cereal box and trim the sides off. You want to be left with a nice flat piece of chipboard. Now measure the width and length of your envelope (with the flap open). Subtract a generous 1/8" off of the width and just under 1/2" off of the length and cut your chipboard to those new measurements. Remember your template has to fit inside your envelope and not block the adhesive of the flap. For example: my envelope is 5" x 5 5/8" so I will cut my cereal box into a square'ish piece measuring 4 7/8" x 5 1/8". Once you have cut your piece make sure it easily fits into your envelope and does not block most of the adhesive on the flap.
Steps 3 &4: Now place the cut piece on your work surface with the envelope on top. Line up the tip of your envelope with the top of the cereal box template and trace the sides of the flap onto the chipboard. Cut along the traced lines and voila your envelope liner template is complete!
Steps 5 &6: Now to line the envelope...place your paper face down and lay your template on top. Try to line the template up to the edges of the paper so you can limit the amount of cutting needed. Trace your template and cut out following the lines. {tip: if you want a super straight line use a paper cutter instead of your scissors}
Steps 7 & 8: Fold a crease into your liner so you will have a nice even line when you fold it closed later. Apply glue liberally around the top edges; the part above the fold. Smooth the paper down and apply a bit of pressure so the envelope and liner will have a secure bond. Give a few minutes to dry and you're done!
{tip: Don't lick the entire envelope closed. If its shut all the way the recipient may use a letter opener along the top and not see the lovely liner at all. Just moisten the tip of the flap or use a small seal/sticker to close your envelope.}
Remember to save the left over scraps from your cereal box to make templates for all the different envelope sizes you have lying around. Lining your envelopes is a cost effective way to make them look both beautiful and expensive. Hope you enjoyed this little how-to. Have a happy Monday!
{Update: the layout and spacing for this post kept changing on its own so I had to play around with spacing and pictures a few times - sorry for all of you RSS subscribers}
Saturday, March 14, 2009
The Custom Process Revealed
Today I want to talk about what really goes into making a custom invitation order. I won't get into the steps involved in both placing an order and designing an invitation. What this post will cover is the steps of assembly, from picking out the right paper weight all the way to packaging for hand delivery. I think it's important for each customer to know exactly what goes into making their invitations in terms of time, cost, creativity and most importantly - love. Because, for a handmade artist, it is all a labor of love.
First Things First: Once the paper weight and color is determined its time to measure and cut. Remember, this is a handmade establishment. There are no machines programmed to cut out each piece of paper (at least there are no machines other than me).
For this order two sheets of paper were used to achieve the desired look which means twice the cutting. A mint green 80lb cover weight paper (medium weight cardstock) served as the background while the text was printed on a white 80lb cover weight paper. The text sheets were all cut slightly smaller than the green to create an even border of color around the invitation, but that comes later.

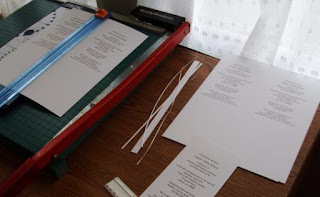
Here you see at the left the paper I start out with measures 8 1/2" x 11". It must be cut on the sides to measure 4" in width. The length is not yet cut.

Each piece is carefully inspected. Only crisp smooth edges are allowed. See where its frayed? This whole step can be very very time consuming.
Second: Once all the background paper has been cut and inspected its time to create the detailed lace work edging for the top of the invitation. Now you can see things taking shape.

Third: I measure the width I'd like the top flap to be and use the groove from my Fiskar's paper trimmer to help me achieve an even line when I score the paper. Now that the top of the invite has been detailed and scored its safe to cut the length of the paper to 9 1/4".

It's important to make sure that each piece of paper is measured exactly the same when scoring the top flap.
Fourth Up: After printing a test sheet on scrap paper and checking the layout its time to print the text. I chose an 8 1/2" x 11" size paper so its printer ready. Since a sheet of paper tends to have a smooth side and a slightly textured side its important to be sure to print on the same side each time when feeding the paper through the printer. This way all invitations are made using the same format.

I find that feeding one sheet of paper at a time ensures that each one is printed evenly. Yes, I use a ruler to make sure. Precision is crucial.
Fifth: More measuring and cutting; length and width wise. I pick a line of text and measure the margin from the first letter and then the last in order to assure that the text on each sheet is centered perfectly. As for the leftovers, the widest strips of paper are saved and used to bundle invitation and stationery sets. Anything else that can't be re-purposed is recycled.
Sixth: Now that all text has been printed and cut its time to add the images, in this case two little bunnies. On the scrap sheet of text that was printed earlier I experiment with the best placement of these little friends. They need to be perfectly centered. It helps to pick a specific letter from the line above and each time I'm about to stamp an image I look to align it with that particular letter.

First I stamped the boy bunny on all the invites then I went back and stamped the girl. I needed them to look like they were holding hands and stamping them separately was the only way to achieve the look.
Seventh: After each invite has been hand printed (stamped) its time to use my watercolor pencils and add some color. Once I pick up a colored pencil I use that color on each invite. For example, with the pink pencil in hand I color the dress and tint the inner ears of the bunnies on each invite, then I use the green and color the boy's shirt and the girl's flower on each invitation and so on until all is colored. It's easier than coloring one invitation at a time and picking up and setting down the pencils over and over.

Without any color these little bunnies look like nudies to me!
Eighth: After the water has been painted on and the paper dries (it shouldn't be that damp or you've used too much water) its time to assemble the invitations.

Ninth: This step involves tying lots and lots of pretty bows. Once they are all tied its time to glue them to the top of each invite and set aside to dry overnight.

So many pretty little bows!

After a good night's sleep I went to check on the invitations. The morning sun had cast such a pretty shadow on them that I had to capture it.
Tenth: My favorite part of every order is stacking all the pretty invitations, counting out the envelopes and bundling them together. There is nothing more satisfying than completing an order and getting it ready for its recipient. I always make sure to tuck a little handwritten note inside to let each client know how truly grateful I am to have been picked for the job.


This little cotton tailed bunny hopped on over and went home with the invitations as a small token of thanks to a wonderful client. Hopefully it will pair perfectly with her gift to give to her friends at the bunny themed couple's baby shower she and her husband are throwing for them.
Since, this order was being hand delivered I was able to present it like a gift. Of course the wrappings had to match the invitations!
It's a Wrap:
First Things First: Once the paper weight and color is determined its time to measure and cut. Remember, this is a handmade establishment. There are no machines programmed to cut out each piece of paper (at least there are no machines other than me).
For this order two sheets of paper were used to achieve the desired look which means twice the cutting. A mint green 80lb cover weight paper (medium weight cardstock) served as the background while the text was printed on a white 80lb cover weight paper. The text sheets were all cut slightly smaller than the green to create an even border of color around the invitation, but that comes later.

Here you see at the left the paper I start out with measures 8 1/2" x 11". It must be cut on the sides to measure 4" in width. The length is not yet cut.

Each piece is carefully inspected. Only crisp smooth edges are allowed. See where its frayed? This whole step can be very very time consuming.
Second: Once all the background paper has been cut and inspected its time to create the detailed lace work edging for the top of the invitation. Now you can see things taking shape.

Third: I measure the width I'd like the top flap to be and use the groove from my Fiskar's paper trimmer to help me achieve an even line when I score the paper. Now that the top of the invite has been detailed and scored its safe to cut the length of the paper to 9 1/4".

It's important to make sure that each piece of paper is measured exactly the same when scoring the top flap.
Fourth Up: After printing a test sheet on scrap paper and checking the layout its time to print the text. I chose an 8 1/2" x 11" size paper so its printer ready. Since a sheet of paper tends to have a smooth side and a slightly textured side its important to be sure to print on the same side each time when feeding the paper through the printer. This way all invitations are made using the same format.

I find that feeding one sheet of paper at a time ensures that each one is printed evenly. Yes, I use a ruler to make sure. Precision is crucial.
Fifth: More measuring and cutting; length and width wise. I pick a line of text and measure the margin from the first letter and then the last in order to assure that the text on each sheet is centered perfectly. As for the leftovers, the widest strips of paper are saved and used to bundle invitation and stationery sets. Anything else that can't be re-purposed is recycled.

Sixth: Now that all text has been printed and cut its time to add the images, in this case two little bunnies. On the scrap sheet of text that was printed earlier I experiment with the best placement of these little friends. They need to be perfectly centered. It helps to pick a specific letter from the line above and each time I'm about to stamp an image I look to align it with that particular letter.

First I stamped the boy bunny on all the invites then I went back and stamped the girl. I needed them to look like they were holding hands and stamping them separately was the only way to achieve the look.
Seventh: After each invite has been hand printed (stamped) its time to use my watercolor pencils and add some color. Once I pick up a colored pencil I use that color on each invite. For example, with the pink pencil in hand I color the dress and tint the inner ears of the bunnies on each invite, then I use the green and color the boy's shirt and the girl's flower on each invitation and so on until all is colored. It's easier than coloring one invitation at a time and picking up and setting down the pencils over and over.

Without any color these little bunnies look like nudies to me!
Eighth: After the water has been painted on and the paper dries (it shouldn't be that damp or you've used too much water) its time to assemble the invitations.

Ninth: This step involves tying lots and lots of pretty bows. Once they are all tied its time to glue them to the top of each invite and set aside to dry overnight.

So many pretty little bows!

After a good night's sleep I went to check on the invitations. The morning sun had cast such a pretty shadow on them that I had to capture it.
Tenth: My favorite part of every order is stacking all the pretty invitations, counting out the envelopes and bundling them together. There is nothing more satisfying than completing an order and getting it ready for its recipient. I always make sure to tuck a little handwritten note inside to let each client know how truly grateful I am to have been picked for the job.

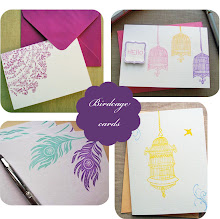
Bundled with a thank you note written on my new Birdcage Cards stationery!

This little cotton tailed bunny hopped on over and went home with the invitations as a small token of thanks to a wonderful client. Hopefully it will pair perfectly with her gift to give to her friends at the bunny themed couple's baby shower she and her husband are throwing for them.

Since, this order was being hand delivered I was able to present it like a gift. Of course the wrappings had to match the invitations!
It's a Wrap:
So there you have it - a peek into the making of a set of invitations. I hope you have a better sense of what goes into completing an order. There are a lot of time consuming details, that's true, but each ensures that every invite put together is done so with precision every step of the way. This small order took two days and one night (for the adhesive on the bows to dry) to assemble and I loved every second of it.
Subscribe to:
Posts (Atom)

 Posts
Posts