


Sunday, May 31, 2009
Birdcage Cards Was Featured in a Treasury!
I'm so excited because I just found out that one of my cards was featured in a new treasury on Etsy called Lemon and Lime by Jinx Murphy Designs. Its very exciting for me especially since I just started listing items in my shop a few weeks ago! And the fact that Jinx Murphy Designs makes absolutely amazing wood cut designs for home decor makes me feel over the moon that she even thought to include me in one of her treasuries. How fun!
Friday, May 29, 2009
Show and Tell Friday
Another Friday, another note card. Well, actually the pattern is unintentional but I do like the idea of a weekly show and tell. What do you think?
 This week's Swallowtail Butterfly Note Card is originally from a mixed set I had made, but I decided to split it up and list each in my shop individually. Over Memorial Day Weekend I had seen a lot of moths floating around and I just kept hoping and wishing that a colorful butterfly would show up as well, but, unfortunately that just never happened. So, I was inspired to make my own.
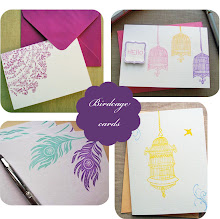
  The butterfly image was hand printed with pigment inks, in either petal pink, marigold yellow or sky blue. Then, before the ink had time to dry, I set it with embossing powder and heat embossed each card to give it a glossy raised effect. By using a creamy white 90lb paper instead of a bright white the tone of the card becomes delicate, soft and relaxing - which is just the way I feel when I spot a real swallowtail.
 Each card is 3 3/4" x 5 1/8" and comes with its own matching envelope and while listed as a single card, if you would like a mixed set please don't hesitate to ask. I'd be more than happy to accommodate. Well, that's all for now. I've got lots of paper goodies to make! Have a happy weekend!
This week's Swallowtail Butterfly Note Card is originally from a mixed set I had made, but I decided to split it up and list each in my shop individually. Over Memorial Day Weekend I had seen a lot of moths floating around and I just kept hoping and wishing that a colorful butterfly would show up as well, but, unfortunately that just never happened. So, I was inspired to make my own. The butterfly image was hand printed with pigment inks, in either petal pink, marigold yellow or sky blue. Then, before the ink had time to dry, I set it with embossing powder and heat embossed each card to give it a glossy raised effect. By using a creamy white 90lb paper instead of a bright white the tone of the card becomes delicate, soft and relaxing - which is just the way I feel when I spot a real swallowtail. Each card is 3 3/4" x 5 1/8" and comes with its own matching envelope and while listed as a single card, if you would like a mixed set please don't hesitate to ask. I'd be more than happy to accommodate. Well, that's all for now. I've got lots of paper goodies to make! Have a happy weekend!
Wednesday, May 27, 2009
I Want Wednesday
 1. I want more things in life to be this funny but true. Old Spice and Soap on a Rope card by afavorite.
 2. I want to make sure my office never looks like this, but, I certainly wouldn't mind getting my hands on one these amazing prints by Joesph O. Holmes from his workspace series.
 3. I want to watch the water boil in this gorgeous
 Monday, May 25, 2009
I Won!
 I'm not the type of person who tends to win things. At bridal and baby showers I'm always the lone wolf at a table of winners who walks away with nada. I'm okay with that fact. I've accepted it years ago as an indisputable truth of nature. So, when I entered a contest for some adorable fabric wall stickers from Mae last week at over at Yellowgoat I never expected to actually win, but that's exactly what happened. I couldn't believe it but my streak is over. Watch out world this winner has arrived.
I Got a "1st"
My niece is four now and by far the most wonderful thing that has ever happened in my life. One of the best parts of being around kids is getting to see the world fresh and awe inspiring all over again and I love being part of an experience for the 1st time.
So, Saturday when Makenna heard the music truck (we told her years ago that the ice cream truck was really a music truck to save us the trouble of saying no to ice cream 5x a week) I decided it was time for the charade to end and told her that this truck had ice cream in it and we were going to get some!
 The excitement in her eyes was purest most beautiful thing. She looked left and right for where the truck would come from; we could hear it but not see it yet. "Aunt Katie," she told me "you check over there" and pointed with her little baby fat finger to the right "and I'll check this side!" Of course, Makenna found the truck 1st and when I looked over at her she was beaming with the excitement and anticipation of her rainbow sprinkled ice cream and, I'm sure, I was beaming with the excitement of getting to share a 1st moment with my little goose.
So, Saturday when Makenna heard the music truck (we told her years ago that the ice cream truck was really a music truck to save us the trouble of saying no to ice cream 5x a week) I decided it was time for the charade to end and told her that this truck had ice cream in it and we were going to get some!
The excitement in her eyes was purest most beautiful thing. She looked left and right for where the truck would come from; we could hear it but not see it yet. "Aunt Katie," she told me "you check over there" and pointed with her little baby fat finger to the right "and I'll check this side!" Of course, Makenna found the truck 1st and when I looked over at her she was beaming with the excitement and anticipation of her rainbow sprinkled ice cream and, I'm sure, I was beaming with the excitement of getting to share a 1st moment with my little goose.
Saturday, May 23, 2009
Link Love: Kid Friendly Projects
 I've got a file folder full of kid-friendly activities. I swear it weighs more than a bolling ball. I used to teach at a daycare - best and most tiring job ever - and I come from a long line of adults well equipped at speaking the "kid" language. So, you can imagine not much in the way of activities geared towards the 10 and under crowd surprise me, but here are a few ideas that I thought incorporated a new twist on an oldie but a goody. Hope they help organize the chaos that a long weekend with bored kids can ensue.
Enjoy...

1. Carton Wallet from Family Fun. Let this time consuming project be your best friend this weekend. It will keep the little ones entertained long after its completed.
 2. Styrofoam Prints from BloesemKids. Okay, so there is not much of a new twist here but its a favorite activity of my neice's and its hand printing so I had to share it.
3. Wave Ware Picnic Plates from Martha Stewart kids. This is a fun one since most of us will be heading to the beach or having backyard BBQ's this Memorial Day weekend.
Friday, May 22, 2009
TGIF!
I'm off to meet a potential new paper supplier this morning (fingers crossed) but before I go I wanted to quickly share a new note card set with you - and go figure, its birdcages. This Birdcage Note Card Set of 6 was a bit of a labor of love. The "hello" greetings were hand printed with pigment inks on to the same heavyweight 80lb card stock that the cards are made of and then painstakingly cut out by hand. I say painstakingly only because I have nerve damage and arthritis in both of my hands. So detail work in bulk can be a little harsh for me sometimes - especially when I'm a perfectionist. But, in this case, it was completely worth it! The 3D framed greeting adds a nice balance to the quirky colored birdcages. I really wish the pictures did these cards justice. They are just sooo much cuter in person!
  Yesterday, I worked all day experimenting with and creating new packaging labels for my boxed note card sets. I wanted to make something that would match the look of the new stationery boxes. Its important to me that everything has a cohesive look. Once I finally figured out the layout and print dimensions it was smooth sailing. The front of the labels were done on my computer while the back has been hand printed. I'm still working out the details for the tags on the stationery sets but the labels for the clear note card boxes are all done. Take a look and let me know what you think.
 Since its a long weekend for us here in the U.S. tomorrow I'll post a few fun kid friendly projects to keep y'all busy and entertained this Memorial Day weekend. Just remember to have fun, relax and enjoy the parades!
This Birdcage Note Card Set of 6 was a bit of a labor of love. The "hello" greetings were hand printed with pigment inks on to the same heavyweight 80lb card stock that the cards are made of and then painstakingly cut out by hand. I say painstakingly only because I have nerve damage and arthritis in both of my hands. So detail work in bulk can be a little harsh for me sometimes - especially when I'm a perfectionist. But, in this case, it was completely worth it! The 3D framed greeting adds a nice balance to the quirky colored birdcages. I really wish the pictures did these cards justice. They are just sooo much cuter in person! Yesterday, I worked all day experimenting with and creating new packaging labels for my boxed note card sets. I wanted to make something that would match the look of the new stationery boxes. Its important to me that everything has a cohesive look. Once I finally figured out the layout and print dimensions it was smooth sailing. The front of the labels were done on my computer while the back has been hand printed. I'm still working out the details for the tags on the stationery sets but the labels for the clear note card boxes are all done. Take a look and let me know what you think.Since its a long weekend for us here in the U.S. tomorrow I'll post a few fun kid friendly projects to keep y'all busy and entertained this Memorial Day weekend. Just remember to have fun, relax and enjoy the parades!Wednesday, May 20, 2009
I Wanna...
Welcome to the first of many "I Want Wednesdays". Every Wednesday I will share a few neat toys, trinkets, baubles, furniture, vacations, goals, dreams, etcetera that I really really want. In this economy you have to be a bit imaginative. Most of us can't just run out and buy anything we want. A mini splurge I can do. A lot of mini splurges, well lets just say its fortunate that I have a rich fantasy life - which, by the way, is not code for delusional.
So, without further ado let's start the show:
So, without further ado let's start the show:
 1. What you never wanted a new bike at 28 years old? Well, if your current one weighed 45lbs like mine you'd want a nice new lightweight bike too. I'm not really a mountain biking kinda girl. I don't shy away from dirt, but I don't appreciate danger either. I like to casually enjoy my bike, riding safely around town on a nicely paved road. I think this little Schwinn will do the trick.
 2. I found this gorgeously romantic pic on East Side Bride and immediately thought that I had to plan an equally romantic backyard party this summer where my guests would be aglow in a sea of mason jar candlelight.

3. I thought I died and went to heaven when I spotted these shoes in the toast catalogue. I'm a mary jane whore as it is but I certainly don't have these patent leather blue ones. I really really want them. I want them so much I'm tempted to call them a need.
Monday, May 18, 2009
Artist Showcase: The Amazingness of Krista Peel
 Its official, Birdcage Cards in on Etsy and open for business. I’m still in the process of writing up listings for all the new paper goodies I made. It seems I may have underestimated the time involved in editing pictures and writing up listings. So, I’ve got a lot more to add to my Etsy store - not to mention the two new note card sets I designed over the weekend.
So, in honor of my Etsy debut, from the comfort of my little workshop, I’ve decided to share a mini-showcase of one of my favorite Etsy artists, Krista Peel. She is talented at many things from drawings and watercolored paintings to hand crafted jewelry, but its her miniatures that have me over the moon...
Friday, May 15, 2009
Birdcage Cards is on Etsy!
I signed up for my Etsy shop back at the end of February but had yet to fill it with any paper goodies. Spring is a busy time for me - lots of bridal and baby showers. Which means lots to do. But I picked a date; I set a goal and have been arranging my schedule around it ever since. Today Birdcage Cards' little Etsy shop will officially open for business. Now, whether or not I get to list as many products as I made for it is another issue entirely.
I made brand new sets of stationery, created a bunch of invitation samples, took their pictures and now all that's left to do is edit those pics, write up about 30 listings and get them all posted by 7:o0 p.m. - just in time for the end of a crazy work week. So, if you'll please excuse me I have some more, rather a lot of, work to do.
 p.s. - I just looked at the picture count that I have to edit and it says 235. Ugghhh! There's just never enough time in a day! I think I can, I think I can, I think I can...
I made brand new sets of stationery, created a bunch of invitation samples, took their pictures and now all that's left to do is edit those pics, write up about 30 listings and get them all posted by 7:o0 p.m. - just in time for the end of a crazy work week. So, if you'll please excuse me I have some more, rather a lot of, work to do.
p.s. - I just looked at the picture count that I have to edit and it says 235. Ugghhh! There's just never enough time in a day! I think I can, I think I can, I think I can...
Thursday, May 14, 2009
Support Your Local Economy: The 3/50 Project
 The 3/50 Project is a simple idea started by retail coach Cinda Baxter in an effort to support our communities and save our local indie businesses from closing up shop right before our eyes. Basically, you pick three local brick and mortar businesses that you want to stick around. It could be a restaurant, a boutique or your local dry-cleaners. You spend $50 a month between the three businesses and help to strengthen your local economy.
It's a great idea because the money you spend in your local indie shop doesn’t just support that store, it supports your community as well and I’m not just talking about coming full circle via taxes and salaries. Since local shops tend to carry hand crafted goods created by other local artisans when you make a purchase at your favorite independently owned and operated store you’re supporting the handmade movement too. The same can be said for making a purchase from a local artist's online shop. While it may not be a traditional brick and mortar store supporting it still has all the same cause and effect relations that the 3/50 Project could ever hope for. Either way you’re saying yes to creative ingenuity and one-of-a kind items and no to flat out commercial monopolies.
Now, I know given the current economic state of things we’ve all had to be a bit more planned in the purchases we make, but that doesn’t mean we suddenly stop buying all together. There are always things we need, things that can’t just be skipped – like your sister’s birthday gift or the need for clean clothes. So, why not take an afternoon to check out some local indie shops or frequent a new restaurant for brunch. You never know you might just find a new favorite.
I’ve made myself a promise to invest in my community and to be a part of the 3/50 project. Will you do the same?
3 indie businesses that I want to stick around:
1. Thin Ice for awesome hand crafted goods made by local artisans.
719 Elmwood Ave
Buffalo, NY 14222
716.881.4321
719 Elmwood Ave
Buffalo, NY 14222
716.881.4321
2. Wild Things for gorgeous one-of-a kind jewelry.
224 Lexington Ave
Buffalo, NY 14222
716.882.3324
224 Lexington Ave
Buffalo, NY 14222
716.882.3324
What would your three be?
Related Links:
1. Check out the post that inspired the 3/50 Project
2. See what Oprah got wrong and how it can do more harm than good
3. Cinda Baxter’s blog
Tuesday, May 12, 2009
Weekend Finds
 A few of my weekend flea market finds already put to good use. I'm loving white ceramics lately. I bought two other similar pieces; one for a fruit bowl and the other a neat planter. That is it will be once I find a plant worthy of it. And for those of you that don't know I'm addicted to old glass bottles. They make the best vases don't you think?
Cereal Box Journal
 I found this cute project on the long thread and just had to share it today. As you all know I'm a big fan of re-purposing old household objects into something new and valuable. Well, this cereal box journal is an example of upcycling at its best. If anyone decides to make their own please let me know and send some pictures. I'd love to share your creativity.
Monday, May 11, 2009
Mother's Day Cards
 I hope everyone enjoyed their weekends and found themselevs loved and appreciated on Mother's Day. Being a parent truly is the most valuable job their is. So, in honor of all you hard workin' big lovin' moms out there today I wanted to share my Mom and Grandma's Mother's Day cards with you. I couldn't share them beforehand for fear of ruining the surprise. Both are variations of note cards that you will find in my Etsy shop when it officially opens this Friday.
This simple yellow tulip was made for my mother. She is a firm believer that less is more. She also has this funny little quirk where she thinks that unless a card says what its for right on it then it can't be used.
 For example, I had made her a beautiful note card to give to a friend of hers for her birthday. It was perfect. It was made specifically for that friend; something I knew she'd like, but I didn't print "happy birthday" on it because I often find words to be distracting. Sometimes I think its just better to write a thoughtful note inside which includes your occasion's greeting. Anyhow, my mother takes the exact opposite stance and the first thing she says when she gets the card is "Is this a birthday card?". Needless to say I was sure to print "Happy Mother's Day" on her card and, go figure, she loved it.
This birdcage card was my Grandma's and I admit to being more than a little obsessed with it. The soft blue and grey colors are paired with this terrific silver envelope. {And yes I did just say terrific - don't make fun you know you love it.} I detailed the front of her envelope similar to my mother's but unfortunately I forgot to take a picture of it. So you'll just have to imagine what it looked like - oops. And, because my grandmother is the kind of woman who understands the beauty of a blank note card her mother's day message was hand written inside.
Alright, that's about it. I'm off to make some pretty paper goods. Happy Monday!
Saturday, May 9, 2009
Mother's Day Arrangement
 My mother's birthday and Mother's Day always fall around the same time - sometimes they are even on the same day. So I'm always looking for at least two great ideas around this time to try. And this button filled vase from Martha Stewart was too perfect an idea to pass up.
How To:
1. Find a vase that is small enough to fit inside your larger one, the one you will fill with buttons, but be sure that your narrow vase large enough to hold a full floral arrangement. Fill the bottom of your large vase with buttons and place the smaller vase inside. Then fill the space between the two with an assortment of buttons tring to keep them in the same color family and heavy enough that they won't float. Once the space is full add water.
2. Now all that's left to do is to add some water to the smaller vase and arrange your flowers.
I don't know about you but this is one gift my mom is sure to love.
Thursday, May 7, 2009
Foggy Morning Show and Tell
Because I love to see what other people's worlds look like I thought I'd share a bit of mine of this morning...
Tuesday, May 5, 2009
How To Make Your Own Mariachi Band
Happy Cinco de Mayo! While there is an awful lot of history behind this Mexican holiday sometimes a kid just needs an excuse for a party. So, on this 5th of May pull out the most colorful streamers you have, decorate the house and make an impromptu musical party.
Let's see, some traditional mariachi band instruments include a violin, guitar and trumpet. That should be easy enough...
What You'll Need To Make All Three:
- 3 paper towel rolls (one for each instrument)
- 6 rubber bands (3 for the guitar, 3 for the violin)
- 2 rectangular tissue boxes (1 for the guitar, 1 for the violin)
- 2 straws or unsharpened pencils (1 for the guitar, 1 for the violin)
- scissors or a box cutter (for the adult only)
- pencil
- glue
- a whole mess of stickers, crayons and markers
For the trumpet all you'll need is to decorate a paper towel or toilet paper roll with some finger paints, crayons or markers. To make both a guitar and a violin (since its all in how you hold it) you can follow the same steps.
1. Grab an empty rectangular tissue box, turn it on its side and stand the paper towel roll on top of it. Trace around the roll and cut out the traced circle. Now you can slide part of the paper towel roll into the tissue box to serve as your guitar's/violin's handle. You may need to glue around the edges to secure it if you cut the hole to wide. If so, let it dry before moving on to the next step.
2. Pull out the paints, stickers, crayons and markers and let the kids go to town decorating their instruments. Remember if you do use finger paints to decorate your instruments you'll have to factor in drying time. For a last minute project it might be best to use markers and crayons instead.
3. Wrap 3 rubber bands of different widths around the box's pre-made opening to serve as your guitar/violin strings. Slide a straw or an unsharpened pencil under the rubber bands but before the box's opening to help with acustics. And voila you're ready to start your very own mariachi band! {tip: a long wooden spoon from the kitchen can serve as the violin's bow}
The best part about this project is that you're not only surprising your kids with an impromptu party but you are teaching them how with a little imagination you can recycle old junk into a lot of fun.
Monday, May 4, 2009
How To Line an Envelope
So your sending a special hello or thank you note and you wanna jazz up your plain white envelope. Only you are using an irregular sized envelope and can't find an liner template to fit it. No problem - I'll show you how to make your own in less than ten minutes with a little re-purposing of items you have around the house.
 Supplies:
- an empty cereal or cracker box
- pair of scissors
- pencil
- ruler
- envelope
- paper to line your envelope with
{tip: you can use wrapping paper for a fun look on a low budget}
- glue stick

How To:
Steps 1 & 2: Break open your cereal box and trim the sides off. You want to be left with a nice flat piece of chipboard. Now measure the width and length of your envelope (with the flap open). Subtract a generous 1/8" off of the width and just under 1/2" off of the length and cut your chipboard to those new measurements. Remember your template has to fit inside your envelope and not block the adhesive of the flap. For example: my envelope is 5" x 5 5/8" so I will cut my cereal box into a square'ish piece measuring 4 7/8" x 5 1/8". Once you have cut your piece make sure it easily fits into your envelope and does not block most of the adhesive on the flap.
Steps 3 &4: Now place the cut piece on your work surface with the envelope on top. Line up the tip of your envelope with the top of the cereal box template and trace the sides of the flap onto the chipboard. Cut along the traced lines and voila your envelope liner template is complete!
Steps 5 &6: Now to line the envelope...place your paper face down and lay your template on top. Try to line the template up to the edges of the paper so you can limit the amount of cutting needed. Trace your template and cut out following the lines. {tip: if you want a super straight line use a paper cutter instead of your scissors}
Steps 7 & 8: Fold a crease into your liner so you will have a nice even line when you fold it closed later. Apply glue liberally around the top edges; the part above the fold. Smooth the paper down and apply a bit of pressure so the envelope and liner will have a secure bond. Give a few minutes to dry and you're done!
{tip: Don't lick the entire envelope closed. If its shut all the way the recipient may use a letter opener along the top and not see the lovely liner at all. Just moisten the tip of the flap or use a small seal/sticker to close your envelope.}
Remember to save the left over scraps from your cereal box to make templates for all the different envelope sizes you have lying around. Lining your envelopes is a cost effective way to make them look both beautiful and expensive. Hope you enjoyed this little how-to. Have a happy Monday!
{Update: the layout and spacing for this post kept changing on its own so I had to play around with spacing and pictures a few times - sorry for all of you RSS subscribers}
Friday, May 1, 2009
Just Three Colors - Red and Yellow and Blue...
I wanted to share a brand spankin' new stationery set today. When I was drafting this image I was inspired by one of my favorite books and movies - The Wizard of Oz. Since I've yet to take up hand carving my own stamps I sent my image in to RubberStamps.net and had it turned into my own art mounted rubber stamp. I love doing that.

Printed on heavy medium-weight 80lb card stock,
note cards measure approx 3.75" x 5"
Can you guess what I named it? That's right, its called "A Horse of a Different Color". While the horse from the movie was shown in four different colors (white, yellow, red and blue) I took a few creative liberties with mine; choosing just three colors and a bit more funky at that - marigold, scarlet and turquoise. A set includes three of each color with coordinating envelopes.
If you'd like to get your hands on a set or see more photos you can either email me now or wait for my Etsy shop to officially open on Friday, May 15. Ooouu, and don't forget to check back here for more sneak peaks to come.
Subscribe to:
Posts (Atom)


